Sentiment Analysis on SharePoint Data Using Microsoft Flow
The term sentiment analysis refers to the ability to look at a string of text such as a comment, and determine whether that comment is positive, negative or neutral.
In some cases such as surveys you are able to design structured questions (on a scale of 1 to 10 choose how much you enjoy this post). However, in many other contexts you might have a comment, note, or description and it would be useful to determine the sentiment. You might want to take an action based on sentiment such as sending an email, or assigning a task, or assigning a sentiment number to be displayed on a report for further analysis.
This post covers how to add sentiment analysis to a comment column in a SharePoint custom list. We can add sentient analysis through an action available in Microsoft Flow. I will add a new Flow that triggers when a new item is added to our list, perform the sentiment analysis action, and write the value back to the SharePoint list for future use. In a real-world scenario you may also wish to take additional actions such as adding a task for your service team to follow up on negative comments, or customizing a response email to the user based on whether the comment was positive or negative.
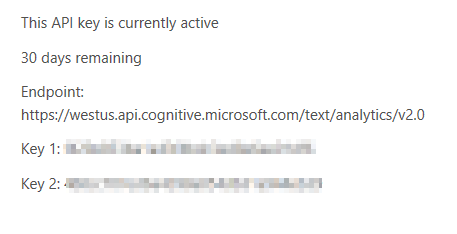
Step 1. Register for an Azure cognitive services trial account. Sentiment analysis is possible through the ‘Text Analytics – Detect Sentiment’ action found in Microsoft Flow. This action requires requires an account key for Azure Cognitive Services. For this post, I will be registering for a trial of cognitive services so that I can demo this capability.
Open this page
https://azure.microsoft.com/en-us/try/cognitive-services/
Go to the language tab and click the ‘create’ button under the ‘Text Analytics API’ line.

Follow the on-screen directions and after clicking the agreement and signing in you will be issued a pair of keys good for 30 days.
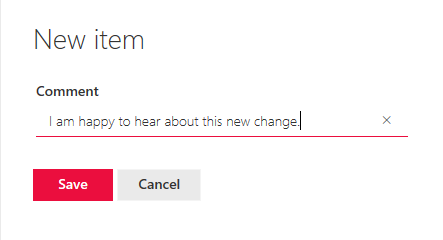
Step 2. Create a SharePoint custom list. Next, for this example I added a SharePoint custom list to my site and added a ‘Comment’ text column as shown below. I also added a second column called ‘Sentiment’ as a Number column type to hold the results of the sentiment analysis.
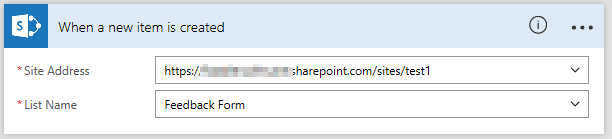
Step 3. Create the Flow. I will start from the blank Flow template. Add a trigger to kick off the flow: SharePoint – When a new item is created. Paste in the address for your site and then select the list from the dropdown for the ‘list name’ field.
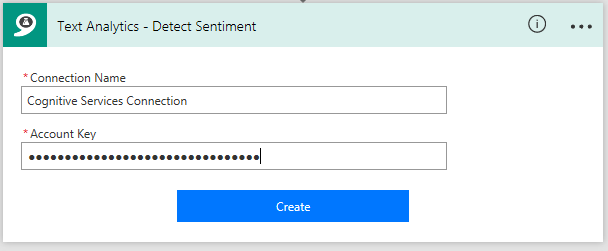
Then add a new step, new action and select ‘Text Analytics – Detect Sentiment’. Provide a name for the connection and add the account key from your trial registration in step 1. Then click the ‘Create’ button.
After the connection is created the action will give you the option to select the text for its analysis.
In my case I will choose the ‘comment’ field from the SharePoint list item.

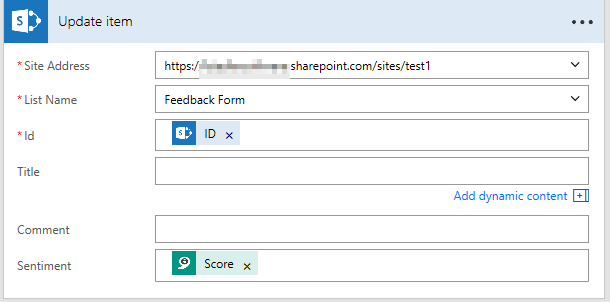
Next, add a new action to your flow ‘SharePoint – Update Item’. Select your site and list. Select the ‘ID’ field from our item as the ID field. And for our ‘Sentiment’ field chose the ‘Score’ value coming from the detect sentiment action.
Finally, add a name for your Flow and click the ‘create flow’ button.

Step 4. Test your flow. Add a few comments to the list including some positive comments and some negative comments.
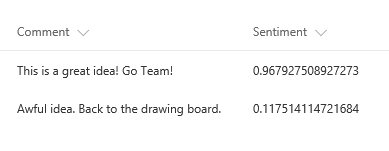
That seems to be working pretty good! Positive comments will approach the value of 1. Negative comments will approach a value of 0.
Conclusion. That concludes my demo of adding sentiment analysis to SharePoint data using Microsoft Flow and Azure Cognitive Services.
Again, in a real-world scenario you could use that sentiment value in different ways. A few examples would be filtered views for positive or negative comments, or taking actions in the Flow based on a negative or positive comment, or using the value in a search result.
I think this is some pretty cool functionality and as this demo shows, it’s very easy for SharePoint and Flow users to put to good use on their own without an enterprise developer.
Calling Microsoft Flow From A SharePoint Designer Workflow
SharePoint Online Column Formatting
Removing The Header on SharePoint Online Modern Pages
About Author
Frank Stadler
Based out of Dallas, TX area. .NET based web developer LinkedIn Profile Twitter Page