Calling Microsoft Flow From A SharePoint Designer Workflow
Microsoft Flow is a cloud based workflow system that can be used with SharePoint Online. While Flow is continuing to add new features and capabilities, many organizations will continue to leverage SharePoint Designer based workflows with SharePoint Online for some time to come. This post covers a technique for calling a Flow from a SharePoint Designer 2013 workflow. This approach allows you to bridge existing Designer workflows with Flow, allowing you to take advantage of Flow functionality from SharePoint Designer based workflows. You could also use this approach with an on premises SharePoint 2013 or above environment to kick off a Flow.
Step 1. Create a new Flow. Create a new Flow from a blank template. For a trigger choose the ‘Request/Response’ connection and select the ‘Request’ card.
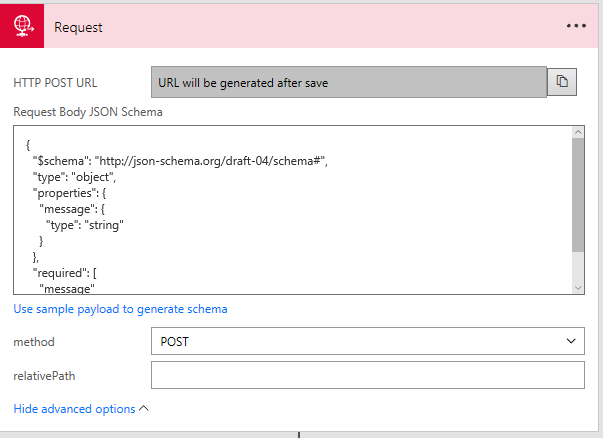
Change the method to ‘POST’ in the JSON schema section paste in the following text:
{

  "$schema": "http://json-schema.org/draft-04/schema#",

  "type": "object",

  "properties": {

    "message": {

      "type": "string"

    }

  },

  "required": [

    "message"

  ]

}
This will add one parameter to our flow labeled ‘message’ which will allow us to pass a value from our SharePoint Designer workflow to the Flow.
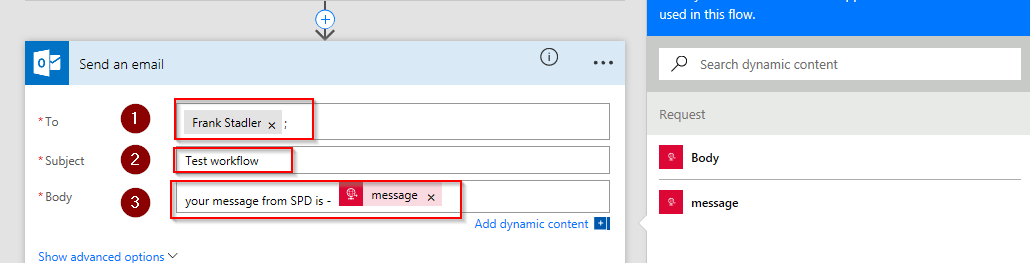
Next add an action, Office 365 Outlook, ‘Send an Email’ action.
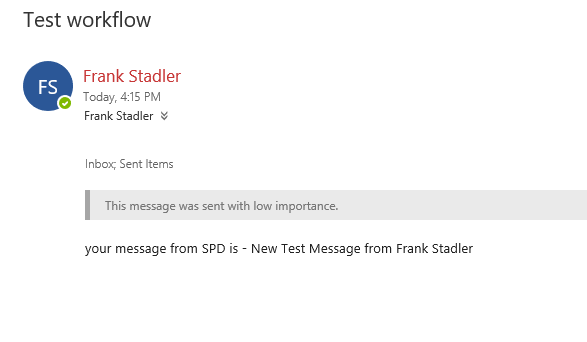
Fill in your own email address for the ‘To’ line and add ‘Test workflow’ as the subject. In the body field type in ‘your message from SPD is – ‘ and then select the ‘message’ field.
Then add a new step – ‘Request / Response’ and select the ‘Response’ action. You can leave the default values for this action.

Next you can give the flow a name and click the ‘Create Flow’ button.

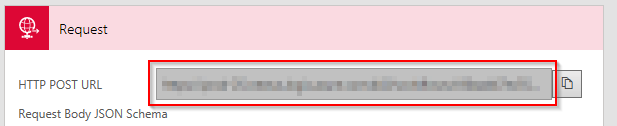
After saving the Flow, the HTTP Post URL on the Request trigger will now have a value. Copy this URL and paste it to Notepad or your favorite text editor.
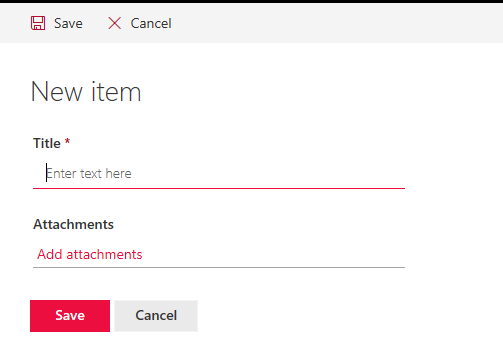
Step 2. Create a new custom list. Create a new custom list on your SharePoint site called ‘Send Email List’. We will use the default ‘title’ field to pass the message to our Flow.
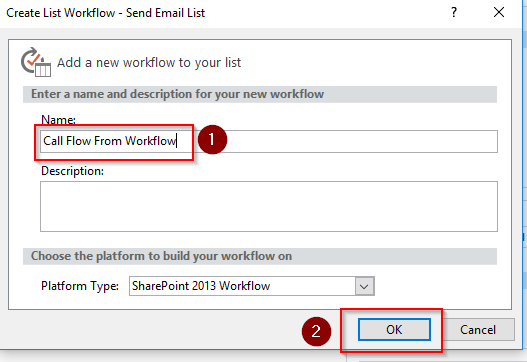
Step 3. Create the SharePoint Designer Workflow. Open your site in SharePoint Designer 2013, click on ‘lists and libraries’, select the ‘send mail list’ and click the ‘New’ button under the workflow section.

You can give the workflow a name of ‘Call Flow From Workflow’ and then click the ‘ok’ button.
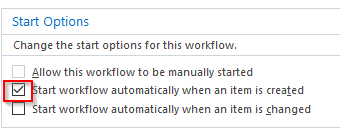
You can click the workflow name in the breadcrumb navigation at the top of the screen and click the created option for the start option.
Then click the ‘edit workflow’ link to resume you editing session.
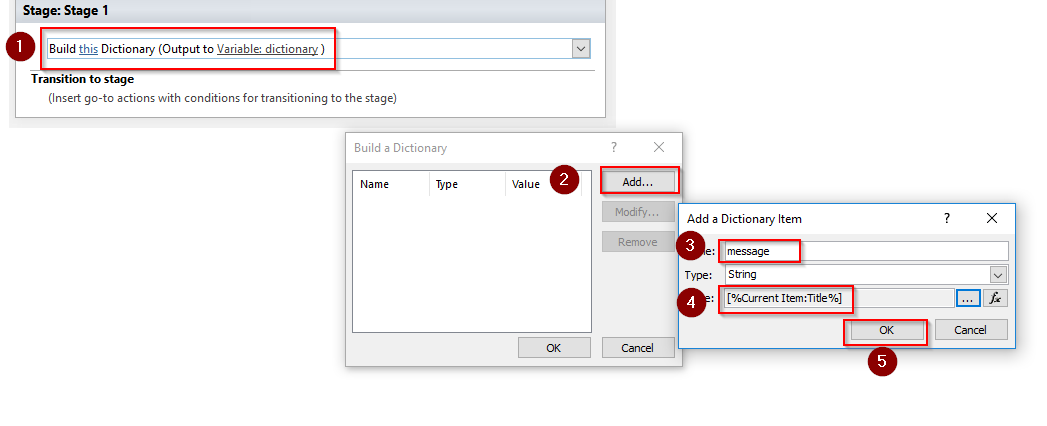
Next add a ‘build dictionary’ action. Click the ‘this’ link to open the details. At the prompt click the ‘Add’ button to add a dictionary value. For the item name type in ‘message’, then for the item value you can do a lookup an select the current item’s title.
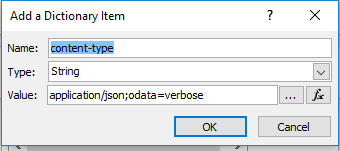
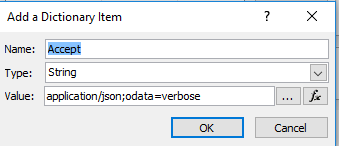
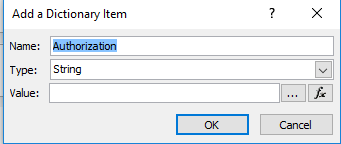
Add another ‘Build Dictionary’ action with the following values and the name of ‘requestHeaderDictionary’.
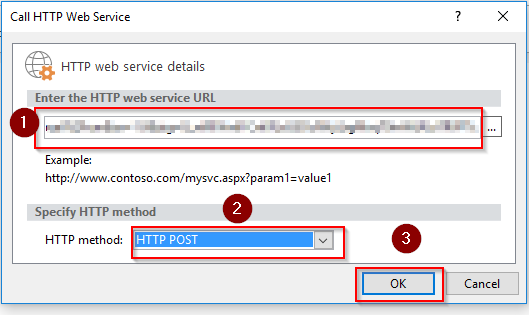
Next add an action ‘Call HTTP Web Service’. For the ‘this’ link paste in the URL for your Flow request step that you copied to notepad in the previous section. Then for the ‘http method’ field choose ‘HTTP Post’ and click the ‘OK’ button.
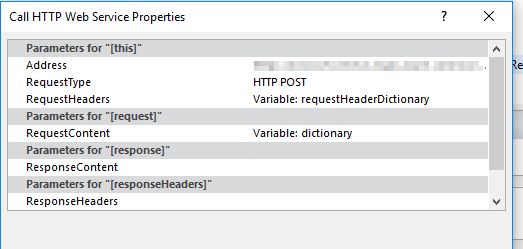
Then for the ‘request’ parameter, chose the ‘dictionary’ variable we created previously.
![]()
Click the drop down on the call web service action to bring up the properties. Set the RequestHeaders field to the requestHeaderDictionary we created above.
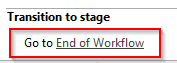
Finally add the ‘End of Workflow’ transition at the end of the workflow.
Save and publish the workflow.
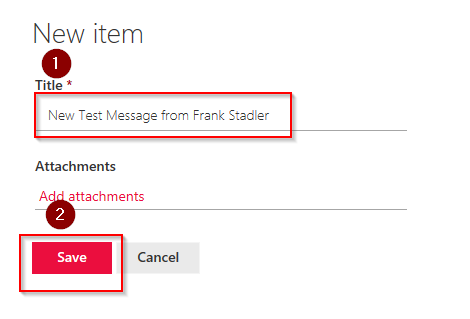
Step 4. Test the workflow. Add a new item to your list with a title filled in and save the item.
The web service will call the Flow and an email is generated.
Conclusion. That wraps up the demo of calling a Flow from a SharePoint Designer workflow. This design would allow you to start incorporating Flow into your SharePoint workflows in a hybrid model. Some reasons you may wish to do this are for certain features in SharePoint Designer based workflows not available in Flow, dependencies on vendor workflow actions, and a desire to keep your designer based workflows running while you start incorporating some Flow capabilities. You could also use this approach with an on premises SharePoint 2013 or above environment to connect to Flow.
The Flow article referenced below can also help you with the syntax of adding additional parameters to your Flow.
References:
Calling Microsoft Flow from your application
https://flow.microsoft.com/en-us/blog/call-flow-restapi/
SharePoint Online Column Formatting
Removing The Header on SharePoint Online Modern Pages

Sentiment Analysis on SharePoint Data Using Microsoft Flow
About Author
Frank Stadler
Based out of Dallas, TX area. .NET based web developer LinkedIn Profile Twitter Page